© 2022 Rachel L. Shumate | All rights reserved.
Who says art can’t be fine and functional? (Probably every art professor I ever had.) This Photo Fun project is a creative way to put your images to good use. A new school year is right around the corner (if not here already depending on your location), and these magnets are perfect for hanging artwork and documents on the fridge, decorating lockers, and sprucing up dorm rooms. Regardless, if you want them for school, the house, or the office, these are fun and funky. Let’s get creative…
What You Need:
- Resin – you can find this at craft stores or online.
- A small plastic cup (large enough to mix the resin in) and a stirrer.
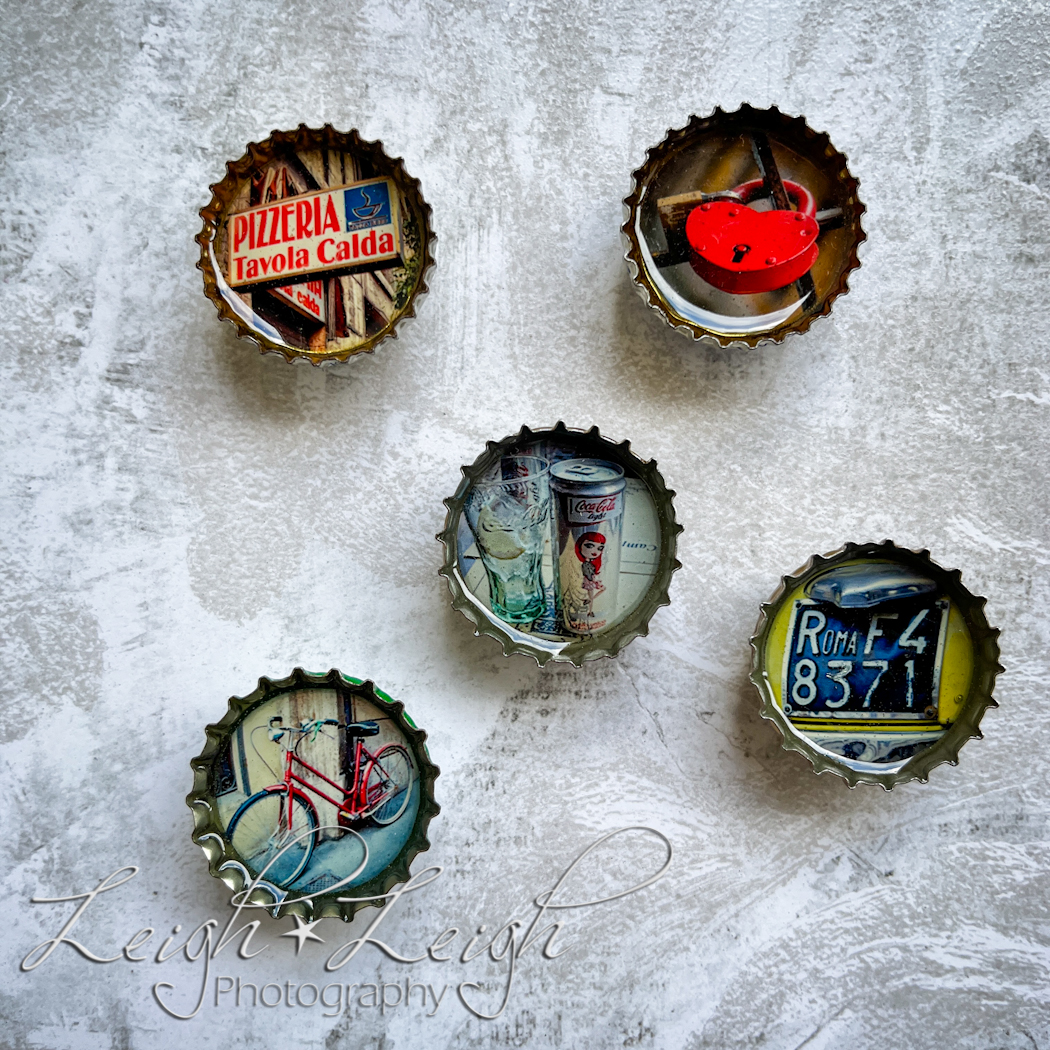
- Some clean and dry bottle caps. I’m using ones off of beer bottles (Kendall likes to contribute to my crafting endeavors), but you can use soda ones as well. Either way, just make sure they’re the twist off kind.
- Some of your printed photographs (needs to be on photo paper, not printer paper). I recommend trying to size them rather small prior to printing them off.
- A circle one-inch hole punch. I Highly recommend using a this over a scissors because the circles fit perfectly in the bottle caps. You can find them in craft stores and online, usually in the scrapbook making sections.
- Some E6000 glue.
- Round magnets.
- Cookie sheet – as part of your working area.
- Aluminum foil – to cover the cookie sheet.
- Toothpicks – for spreading resin and popping bubbles.
- Q-tips – for cleaning up any minor spillovers.
- Paper towels – for any big messes.
- Rubber gloves – I personally find them to be more of a hinderance, and just make sure to wash my hands really well if I get any resin or glue on myself.
Directions:
- Ready your workspace. I suggest placing newspaper, or some kind of covering, on top of your (flat and even) working surface to protect it from any accidental spills. Also, it’s a good idea to work in a well-ventilated area because resin is stinky stuff. Don’t forget to gather all of your supplies before starting. And please keep safety in mind, follow all resin directions according to packaging, and use good sense.
- Print and cut out your images using the one-inch hole punch.
- Line your cookie sheet with aluminum foil to prevent any resin from getting on your bakeware.
- Place magnets down on the cookie sheet, spacing a few inches apart.
- Put a dab of E6000 glue on each magnet and then place bottle caps firmly on top, with the edges facing up like little cupcake liners. Then wait for glue to dry.
- Next, put a very small dab of glue inside the middle of each bottle cap, and then add your little circle prints on top. Allow to dry. The glue is simply to keep your print on the bottom of the cap once you pour the resin, because sometimes they tend to float upwards.
- Next, mix your resin according to the directions on the packaging.
- Once the resin is ready, pour (or dab) it carefully into the bottle caps, making sure to cover the entire picture. You don’t necessarily have to fill it to the top, but it does look nice…
- Allow your bottle caps to sit for 24 hours, or for however long the directions on your resin package suggests. Sometimes the resin gets bubbles in it. Usually, these come up and out on their own, but I like to encourage them with a toothpick. So, I recommend watching to make sure these pesky bubbles get out for the first little bit before placing it aside in a safe place to harden.
- Clean up your workspace and dispose of unused resin.
- And voilà! Now you have some spiffy new magnets to adorn your fridge, or other metal covered spaces. I actually first made a ton of these to hang all of Olivia’s artwork on our fridge. They’ve come in VERY handy, haha.
I can’t wait to see what you create! Please share via social media! 😊
PS: If this is outside of your wheelhouse, but you would still like cute magnets, you can find some online in my boutique (like the Italy collection featured above).