© 2022 Rachel L. Shumate | All rights reserved.
This gift idea is LIT!! Yes, pun intended. I’m a total cornball. Want an inexpensive way to give a personalized and sentimental gift? Yes, please?! Well, here’s how… I came across this amazing project idea to decorate a candle jar with a photograph, so of course I was like, heck yeah! And I’m here to give you my findings because things got a bit sticky (or maybe not sticky enough).
Remember the image transfer project I featured awhile back? Well, this works off the same idea – because laser printers rock!
Basically, you print off a picture on regular office paper using a laser printer (try your local UPS store). Then, take some packing tape and place it over top of your image, and use a credit card to really press and smooth the image into the tape. Something to keep in mind: you’re limited to the width of the packing tape so you’re going to want to consider the image dimensions, as well as the size of the jar you’re going to place it on. Once you’ve smoothed out your taped image, cut it out and place it in a bowl of warm water for a few minutes. After it’s soaked a bit, start rubbing all the paper off the strip of tape. Then, rinse it off and lay it sticky side up to air dry (don’t pat dry).
At this point I was simply giddy because I was thrilled with how well the image transferred. Fast forward fifteen minutes or so and I was a bit disappointed. In theory, and according to all the tutorials I’d read, the tape was supposed to regain its stickiness once dry, leaving me with a super awesome sticker to apply to anything my heart desired. For whatever reason, mine did not. I tried four different times.
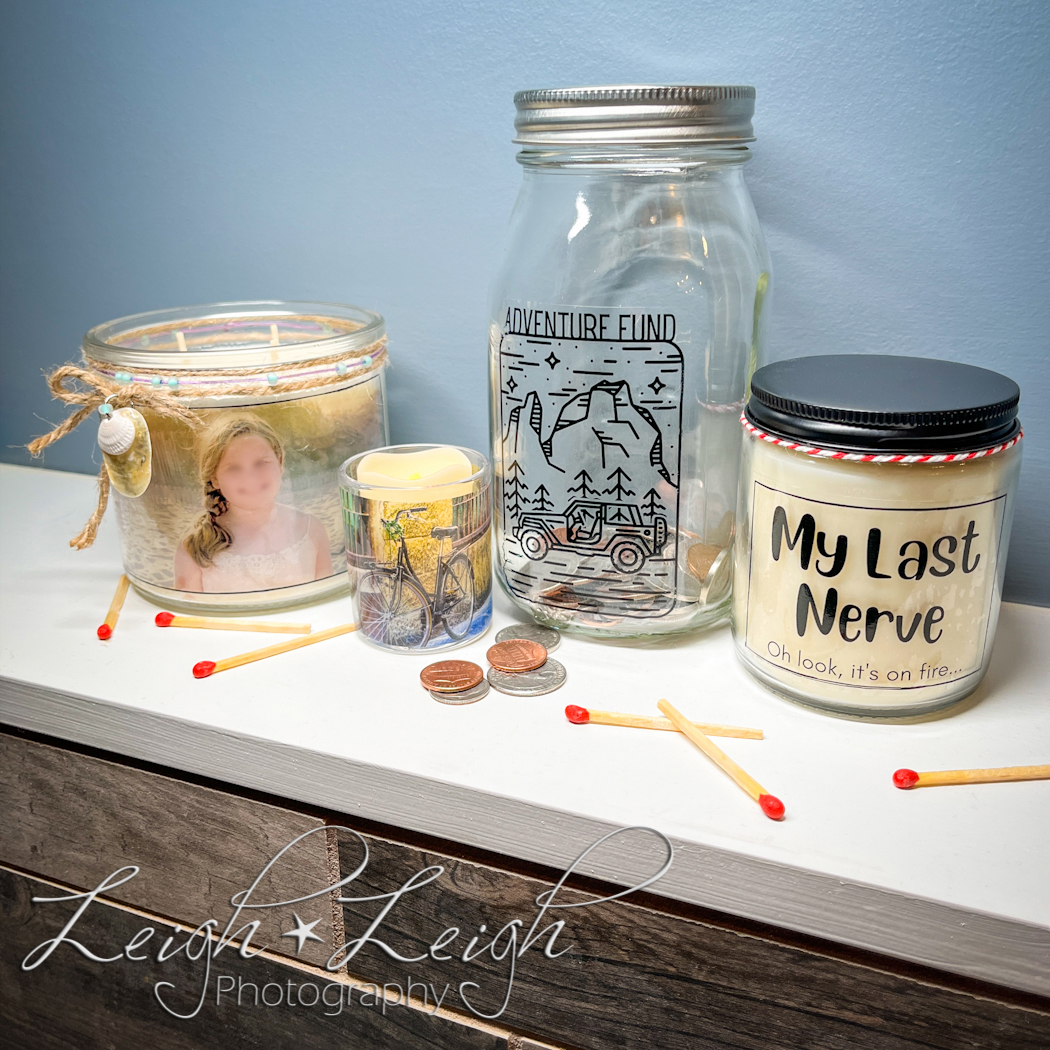
However, all is not lost!! I’m still calling this a win. (Never underestimate my skills; I am one crafty mother…) You can just glue, decoupage, or tape your newly transferred image onto the glass jar. For instance, the glass candle holder, with the photograph of the bicycle, merely has the transferred image wrapped entirely around it with the two end pieces taped together in the back.
After this fun experiment, I decided to take the project a bit further and try out sticker paper that I could print at home. (I used Avery Printable Sticker Paper, Glossy.) The perks to sticker paper are that you’re not as limited size-wise and you can use your home printer to get the job done. So, in the name of research, I spent the day playing – er, I mean working – on various designs and creations. I made a super cute sticker of Olivia for a candle that I then decorated (because I’m extra like that), as well as a snarky label for the other candle (which I seriously can’t stop laughing about). I also made another graphic for the mason jar just because I was on a roll. If I hadn’t run out of time, our whole house probably would’ve been covered in labels and stickers…
The sticker paper was fairly easy to use. It’s also compatible with all those fun things that I don’t have like a Cricut, for example. Though a word to the wise… I learned the hard way that you want to wait before touching or cutting out your stickers. It’s best to let the ink dry for quite a while (10 minutes is apparently NOT long enough) because things get very smeary and you’ll get a bit cussy (or at least I did). So, no-touchy for at least 30 minutes before continuing.
In all, it was a fun project. I thought the tape transfer actually produced a better image than the sticker paper, and it’s significantly cheaper. The print from UPS costs next to nothing, and nearly everyone already has packing tape. The sticker paper, while around $10 for several sheets, does allow for more creativity and convenience. Either one transforms a cheap candle into a pretty “wow” gift for yourself or someone else (just make sure the candle smells yummy – that’s pretty dang important). Hope you enjoy. Happy creating…!
Some Things to Consider:
- All the white highlights and places in your image will be clear once transferred, and the entire image will be rather translucent. It’s best to place your sticker on the jar of a white candle. Also, when the candle burns, the image will glow and be quite pretty.
- Make sure that all tape, stickers, and embellishments are safely away from the flame area. It won’t be a very nice gift if it causes a housefire… (This should be obvious, but still worth mentioning.)
- You can use chalk paint and Mod Podge to really up your crafting game if you want to go the decoupage route.
- This sticker project opens up a whole can of worms because the possibilities are endless… It’s not just candles, you can now fancy up all kinds of things! The only limit is your imagination.