© 2024 Rachel L. Shumate | All rights reserved.
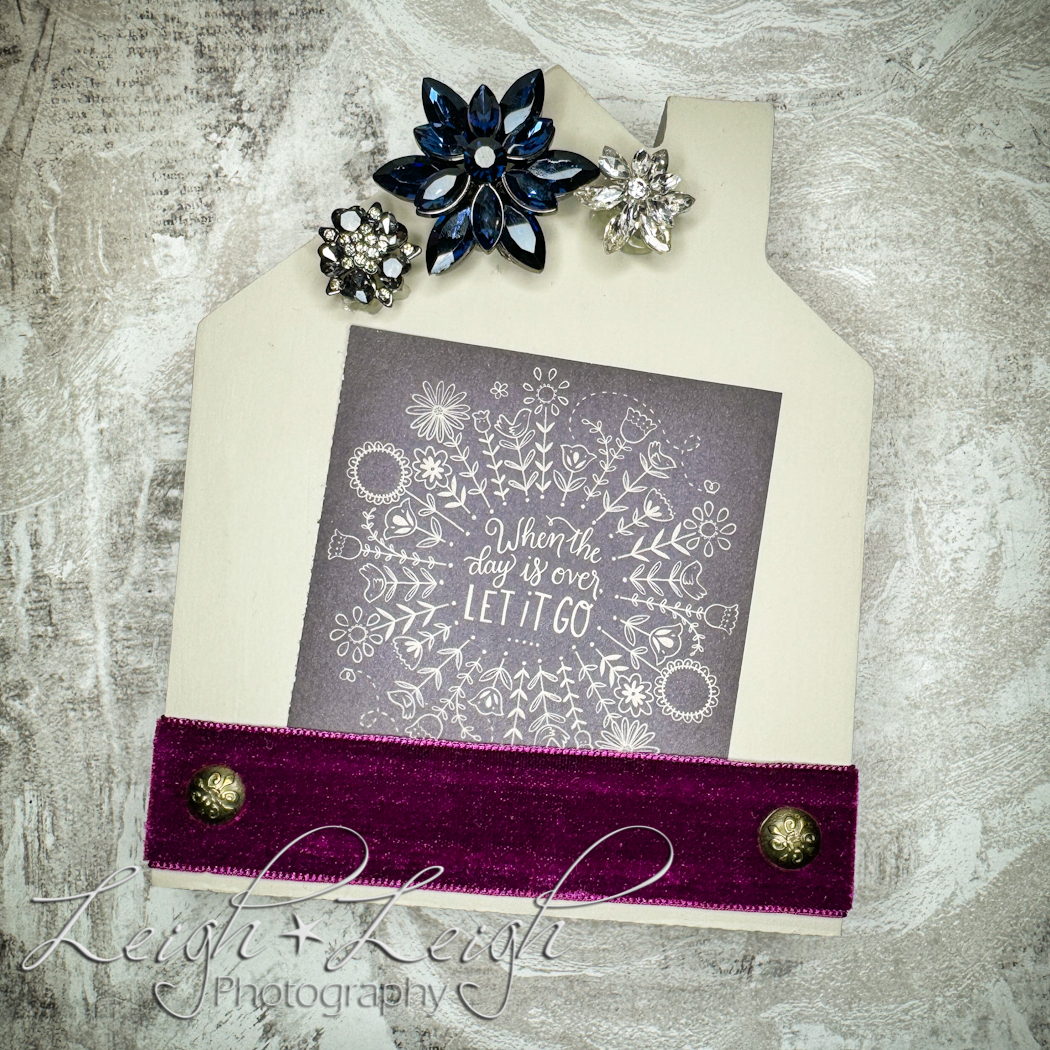
We’re getting crafty on the blog again today…! This Photo Fun project is a clever way to display your prints – or in this case a cute affirmation card. I actually created this frame (of sorts) for my best friend, which is why it’s so chic. (She’s quite fashionable, loves pictures, and likes bling.) And I can say from personal experience, that these make for excellent gifts! (She absolutely loved it!) Of course, you can certainly make one to keep for yourself, or several at a time and give a few away. Regardless, they’re sure to be a new favorite décor item. They’re fabulous for displaying photos, but you could also get creative and use them for recipes, notes, affirmation cards (like I did for the featured image), and so forth.
Let’s get started…
What You’ll Need:
- A thick wood plaque or flat piece of wood that can stand on its own
- Sandpaper (if the wood is rough)
- Acrylic paint (if you would like it painted, but it doesn’t have to be)
- Paint brush
- Hot glue gun
- Embellishments
- Ribbon
- Decorative tacks or upholstery tacks (not thumbtacks)
- A hammer
- A photo for displaying
- Wax paper (to cover your work space)
- Paper towels (for any messes)
Directions:
First, make sure your piece of wood is smooth, and sand it if necessary. No one wants to get splinters from their decorations, ha. Then apply at least two coats of paint. If you have a gorgeous slab of wood instead of a plaque, you might rather varnish it or leave it natural.
After your coats of paint have dried, measure the ribbon and cut it. Make sure your ribbon wraps all the way around the bottom of the wood, meeting in the back. I recommend leaving it long enough to overlap a bit and fold the tip of the ribbon (that’s on top) over just a tad for a more finished look.
Once you’ve measured and cut your ribbon, find the middle (that will be the front), and use a hot glue gun to glue the bottom inside edge of the ribbon to the wood. This will essentially create a sort of pocket and prevent your picture from sliding out the bottom, and it will keep your ribbon straight. Next, hammer in a decorative tack on either side (towards the edges).
Then, flip your project over and pull the ends of your ribbon around to meet in the middle around the back. You might want to apply a bit of glue underneath the ribbon on the back as well so that it doesn’t droop. Take the two ends and, folding one end over the other, hammer another decorative tack into the center to hold them in place.
The next step is to add embellishments to the front. (Just make sure they aren’t going to interfere with the print once it’s in place.) I actually used buttons and stuck them on with a glue gun. However, you can use anything you like to add some pizzazz to your work. Craft stores are in no short supply of such things. If you’re feeling extra artsy, you could even paint a design or stencil some words on it. Finally, after everything is complete and dry, insert a photo into the front “pocket” and enjoy your handiwork!
PS: During the creation of this frame, I quickly learned that my hot glue gun skills are noticeably lacking… (My husband found this whole project extremely entertaining!!) If you’re in the same boat, fret not! You can easily pick off any mistakes, and stringy glue things (that are seemingly inevitable). There’s definitely room for error and do-overs.
PPS: I found everything I needed for this project at my local craft store – except for the hammer, and my hubby’s sarcastic comments.
🙂